RSS Feed

Tampilkan postingan dengan label Tutorials. Tampilkan semua postingan

Senin, 14 Maret 2011

Create your own Woodgrain papers

There's something about "Woodgrain papers" that give a really fabulous look to any project. Is it the feel of texture or the intricate, unique pattern? Or is it simply the natural looks that pulls the eye toward it?

Here is a really easy technique which will have you producing your very own, co-ordinating woodgrain papers in minutes! 

What you'll need:
Woodgrain Embossing Folder
Card
Ink


I have used a "Universal Embossing Folder" available here, however there are many of them out there so do shop around.


Step 1: Run your card through your die-cutting machine to emboss the woodgrain pattern onto your card.

Step 2: Using your desired coloured ink, carefully brush the pad across the raised pattern to reveal a beautiful print.

Try with lots of different colours, maybe 2 or more and start co-ordinating beautiful designs.

Have fun!

Selasa, 08 Maret 2011

Material Flower Tutorial

Flowers are beautiful and what better way to embellish a card than with a self made one? Follow these simple steps to start creating your own unique designs.

Basic Materials you will need:
Material 4 x 4inch
Button
Needle/Thread
Scissors

Cut a rough circle (doesn't have to be perfect) from your 4 x 4 inch material. 
Starting from the reverse, sew large stitches around the edge or your circle. Once complete, pull the thread gently to bring your flower together. 
With your needle/thread still attached, secure your bloom into place with a button.

Other Options to concider:
  • Try using different sized material to produce smaller/larger blooms.
  • Use different textures for different looks eg. silk or denim.
  • Create your own design by stamping onto your material (as I have done here). "Staz On" is a good ink for this.
  • Be creative, ditch the button and rummage through your stash. Try brads, sequins or even eyelets?
  • "Bling up your Bloom" using glitter glue, Liquid Pearls, Gems etc
What to do with your beautiful "Blooms"?

Depending on the size you have created, they can easily be attached to your papercraft proects for example: Cards, Layouts, Gift Boxes etc with a strong adhesive.

Here's another idea:
I didn't have the coloured material I needed, so instead I added colour to my plain material using Promarkers. You will need about 3 layers of colour, leave to dry.
(Created from 4x4inch material)
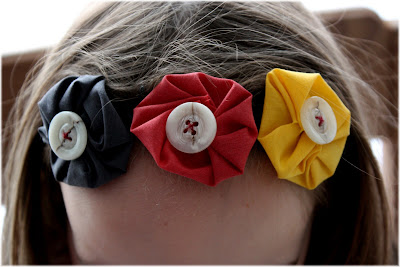
Once all blooms were complete, I stitched them onto a plain hair band. If your hairband is wide enough, you could glue them on.

This is a beautiful, quick technique, the possibilities are endless. You are only limited by your imagination.

Have fun!

mangacan update